How to be more than just a ‘Notebook Data Scientist’: End-to-End ML (Part 3/3)

Are you also one of those people who majored in something non-technical and then decided to pivot into data science because, well, everyone kept saying it was the sexiest job of the 21st century? (Just asking for a friend.) But really, I want to ask you this — have you ever felt that deep sense of accomplishment when you create something that you can actually point to and say, “Yep, I made that!”? Whether it’s a painting you’ve proudly hung up, a puzzle you finally completed, or even an app or website you built from scratch.

As a Math and Econ major, my “creations” mostly involved beautifully color-coded notebooks filled with multicolored comments, PowerPoint slides with all the right waterfall charts, and the interactive dashboards (that no one looks at). These things are absolutely critical to being a rockstar data scientist (seriously, don’t skip them!), but…do you ever miss the thrill of really creating something — something that people can use? Something creative and tangible that makes you go, “Yep, I did that.”

For those wondering, “What on earth is a Notebook Data Scientist?” — well, you know who you are. You live in the magical world of Python or R notebooks, where all your work stays safe and cozy in that environment. And hey, let’s be clear: You’re awesome! This isn’t a roast. It’s an invitation. An invitation to take those tools you’re crafting and take them one step further so the rest of the world can enjoy the fruits of your labor.
So, let’s get right into it. In a previous article, we dipped our toes into how we can build a facial recognition algorithm and also build a website that tells you which Formula 1 driver you look like. Pretty cool, right? Well, today we’re going all in. Buckle up, because I’m going to walk you through every.single.step from having an ML model in your notebook to deploying it as a full-fledged web app that anyone can use. Ready? Let’s dive in!
8-Step Process (Notebook to Web Application)
1. Create a Website

This is the task that will take the longest to learn during the process. There are so many tools out there that have automated this process but I’m a big believer in learning the fundamentals of a task before utilizing more efficient ways to do it. Therefore, I highly recommend the same process and I promise that your future self will thank you for it. However, learning the fundamentals takes time. That’s why I put money where my mouth is signed up for a web development bootcamp on Udemy. This is the first big step that you must take in this journey for the rest of pieces to fall into place. But if you’re a developer pivoting into data science, you can skip this part.
- GitHub Repository for this project ➜ [Link]
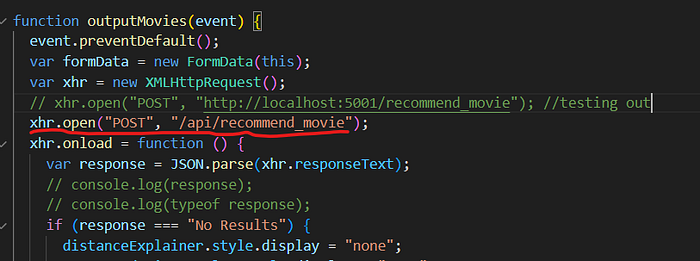
2. Build a Flask Server
First task here is to export the Machine Learning model we created last time. We do this by converting it to a pickle file. Later, we will be importing this pickle file into the Flask server.
Flask is being used here to create a web server that allows users to interact with your movie recommendation system via HTTP requests. Flask is handling the requests, routing them to specific functions (function in the util code below), and sending responses back to the user.
util.py
server.py
In summary, Flask serves as the web framework that powers your movie recommendation system, allowing users to send requests (containing a movie name) and get responses (movie recommendations) in return. It’s handling the routing, form data, and the overall request-response cycle for your application.
3. Install Nginx in your local server
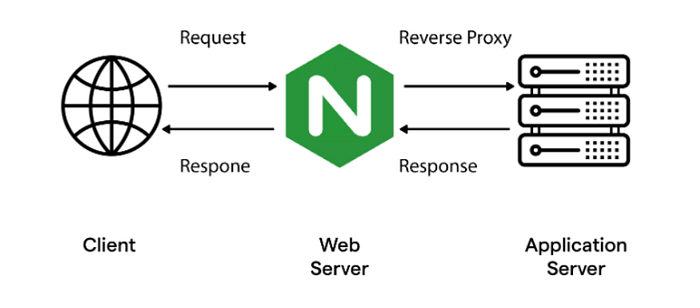
Nginx is a high-performance web server and reverse proxy used to handle web traffic efficiently. When paired with a Flask server, Nginx acts as a middle layer that forwards client requests to the Flask application running on a specific port (like port 5000 for example). Flask, on its own, isn’t ideal for handling high traffic or serving static files in a production environment. Nginx improves performance by efficiently serving static files, distributing traffic, and securing connections, allowing Flask to focus solely on processing application logic. This combination helps make your Flask app more scalable, secure, and ready for production.
First thing to do here is to go to this website and downalod nginx. After you install nginx on your local drive, find the nginx.conf (inside “conf” folder) file in your local drive and make the below edits:

Once you make the above changes to the conf file, also change the below directory in the app.js JavaScript file. The previous step concluded everything that we have to do on our end before we test it locally.
4. Test the app on your local server
Before you open the below video, I want you to open server.py and util.py on PyCharm and index.html, styles.css, and app.js on Visual Studio.
In the video, I took the viewers through how to run a flask server on PyCharm and also how to test your website on the local server. At this point, we know that our web application is working locally. Now it’s time for us to host it for the world to see (I know, pretty dramatic right?). If you’re following along and struggling to get to this point, please drop a comment below and I can help you debug.
The next set of steps is exactly similar to what we did above in your local machine except this time, we are doing it in a cloud environment.
- Local Server ➜ Amazon AWS EC2 Server
- File Explorer ➜ WinSCP
- Keyboard and mouse to interact with your local machine ➜ Git Bash commands to interact with the EC2server
5. Create an Amazon EC2 server
Once you reach the AWS website, follow the instructions shown in the video and create an EC2 instance. Make sure you save the .pem file in your local directory, which will as a key to connect to your EC2 instance.
6. Download WinSCP to connect and transfer files to the server
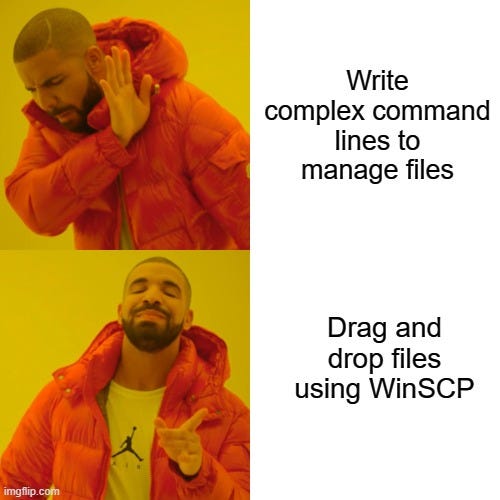
WinSCP is a free software tool that allows secure file transfers between a local computer and remote servers using protocols like SCP, SFTP, and FTP. It’s especially useful for transferring files to an EC2 server because it lets you connect easily using your SSH key and securely upload or download files, simplifying the management of server files without needing complex command-line operations.
The SSH key mentioned above is the .pem file we downloaded when we created the EC2 instance. Once we connect to our EC2 server using the key, we can safely transfer files from our local directory to our EC2 server. How do you connect to the EC2 server? 14:26 to 18:05 perfectly describes everything that you need to transfer the local files in your directory to the AWS server.
Note: We can also do file transfers using commands, but using WinSCP is much easier for the purpose of file transferring.
7. Install Nginx in Ubuntu and create conf files
Once you transfer your files using WinSCP, download Git Bash. Git Bash is the tool that will be used to “talk” to our server. If we want to edit a file, install a package, or run our server, we can do all those things using Git Bash. Using Git Bash to communicate with your Ubuntu EC2 server means you’re using a command-line interface that emulates a Unix shell on your Windows machine. With Git Bash, you can run SSH commands to securely connect to your EC2 server, manage files, and execute commands remotely, just as you would on a native Linux terminal. It simplifies server administration and file handling through familiar Unix-style commands.’
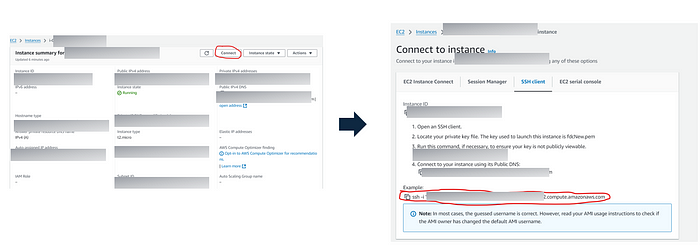
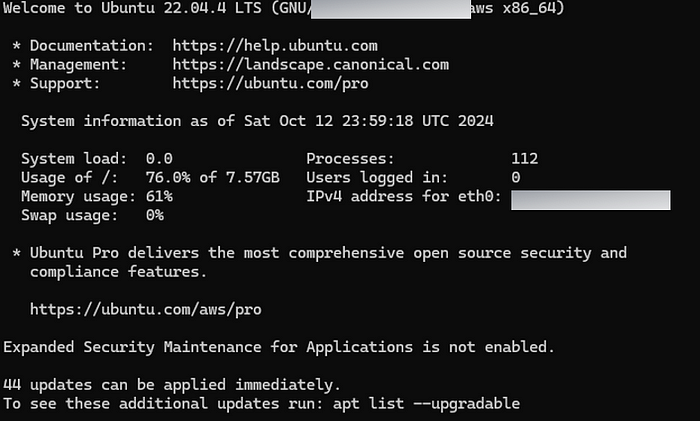
Go to your EC2 instance and copy the command circled in the photo on the right side to connect to the server using Gitbash (remember to change the path to the .pem file). Once you successfully connect, you should see an output like below.
Once you connect to your EC2 server using Gitbash, run each command in the given order below.
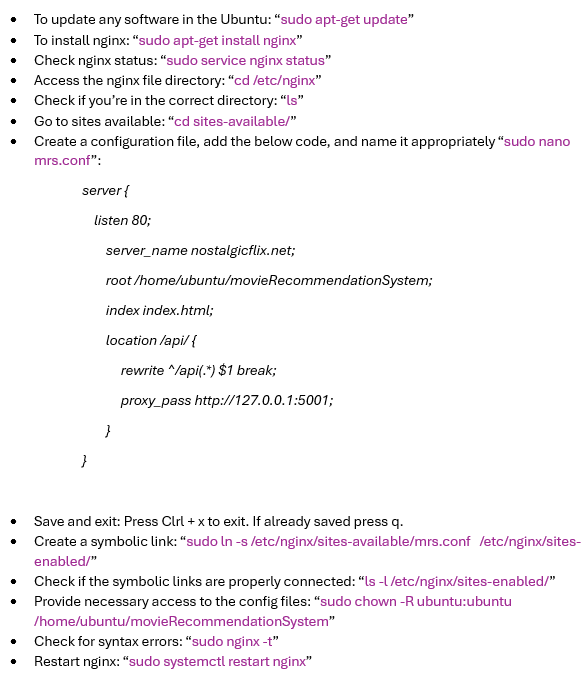
After that, it is time to run to the server on your ubuntu machine following the below steps.

8. Test the functionality
Once you run all the above commands, it is time for us to test our web application out on the cloud server. Use the Public DNS that AWS provides and enter a movie name to see if this works.

9. Buy a domain and test it (optional)
If you really want to share this with the world, I would suggest buying a domain for a cheap price and then connecting it to your Public IPv4 address as shown below.

If you made it to the end of this article, I urge you to go and check out nostalgicflix.net and find some similar movies to your favourite movies. This will most likely be my last 3-part series of end-to-end ML projects that I write about. I have learned that it’s much easier to show and tell rather than write and tell when it comes to end-to-end project (more on that later). I also want to give a quick shout out to ChatGPT who helped me write comments to my code (the most boring — yet important — part of coding)
“As always, I hope you have learned something new.”


